How to Modify the Shanghai Telecom IPTV ZTE B860A Box
When I upgraded my broadband to 500M, Telecom included IPTV and two ZTE zxv10 B860A set-top boxes. When I opened the IPTV menu, I found that everything cost extra. It looked like an Android 4.1-era system, so I wanted to try flashing it. After searching, I found no tutorials for Shanghai Telecom IPTV, so I had to figure it out myself. I forgot to take pictures while I was working, so all I can share here are the steps.
Feel free to ask me if you run into problems. 1. Preparation A USB drive, a TTL cable (a USB-to-TTL CH340 module; search Taobao for CH340), and a ZTE zxv10 B860A set-top box (Shanghai Telecom 4K IPTV). 2. USB Drive It is best to format the USB drive. Copy the APKs you want to install onto it. I used Dangbei Launcher and Dangbei Market. 3. Install the TTL Driver (Skip This If Already Installed) Connect the TTL cable to your computer. The computer will indicate that a driver is needed. Right-click Computer -> Manage -> Device Manager -> Other devices. Find the yellow icon for the device without a driver, right-click it, and choose Update Driver Software -> Browse my computer for driver software. Set the path to the TTL driver folder (ask the seller for the driver). Once installation succeeds, you will see the new device. Right-click Properties -> Port Settings -> Bits per second and select 115200. (Also note the COM port number.) 4. The Set-Top Box 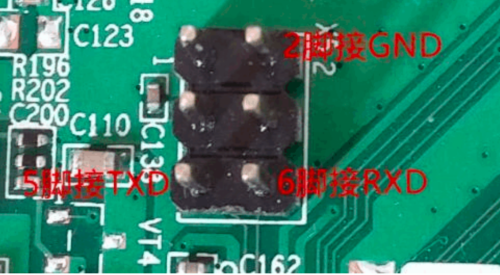 Disconnect the cables from the set-top box and open its case. Plug in the USB drive and connect the TTL cable. Wire colors: red +5V, black GND, green TXD, white RXD. These may vary, so ask the seller which color corresponds to which signal, or check the product details for the cable you bought. Connect black (GND) to pin 2, green (TXD) to pin 5, and white (RXD) to pin 6. Plug in the set-top box's power cable and turn it on. 5. Open PuTTY Select Session on the left. Set Serial line to the TTL cable's COM port (COM4 on my computer), set Speed to 115200, and click OPEN. 6. TTL Connection If everything goes well, the connection screen will open. A lot of messages will scroll past at first. (If nothing appears, switch off the power and swap the green (TXD) and white (RXD) connections from step 3: green (TXD) to pin 6 and white (RXD) to pin 5. Then turn the power back on and repeat step 5.) After the messages finish, wait a moment and press Enter. You should see root@n200:/ #. Start adbd: start adbd. View disk information: df. View file information: ll/storage/external_storage/sda1-h (or enter ls /storage/external_storage/sda1). Copy the files from the USB drive: cp/storage/external_storage/sda1/*.apk /data/app. (/storage/external_storage/sda1 is the USB drive directory. Your set-top box may differ, so find the corresponding directory.) cd /data/data. Finally, set the launcher: am start com.dangbei.launcher. adb shell settings put global install_non_market_apps 1 (I think this may be optional, but I entered it). Remove the restriction on installing third-party APKs. 7. Remove the Restriction on Installing Third-Party APKs (Most Important) Edit the configuration: vi /data/ztecfg/stbconfig.ini. Find [Android] (you can type /, then [Android], then press Enter to search quickly; if you cannot do that, look through it line by line). Type i to enter editing mode. Change the parameter to AppInstallCtrl=3; if it is missing, add a line. Press ESC to leave editing mode, then enter :wq (save and quit). Edit the factory configuration file: vi /cache/reset/stbconfig_clear.ini. Find [Android] (you can type /, then [Android], then press Enter to search quickly; if necessary, look through it line by line). Type i to enter editing mode. Change the parameter to AppInstallCtrl=3; if it is missing, add a line. Press ESC to leave editing mode, then enter :wq (save and quit).
Published 05/05/2018 · Krunk Zhou
Join the conversation