A Closer Look at My Smart Home and Home Assistant Configuration
Introduction:
Home Assistant is a Python-based open-source smart home system. It supports devices from many brands, so you can set up voice control and automate them.
I have smart devices from several brands at home. I chose Home Assistant so I could control them all in one place.
This project started in late 2017 and was completed in early 2018, when I had only a few smart devices in my dorm. I expanded it in 2019, building out the full setup after moving into a house near the university.
This article contains a lot of code. Feel free to use the navigation on the right to jump to the section you need.
Design:
My smart-home design goals are:
- One switch each on the desk, by the door, and beside the bed to control all the lights and turn the security system on or off
- Automatically turn off all the lights when I leave home, and turn them on when I return (only between sunset and bedtime at 12:00)
- Arm the security system when I'm away and send a notification to my phone if someone enters my room.
- Monitor my room, record every timestamp, and generate a report page I can view whenever I want.
- Remotely access the controls and check the room's status
- Make it easy to share access when lending out the room.
- Provide an open API for other interesting projects.
- Connect to HomeKit so I can control it through the iOS Home app.
- Enable Google Assistant, Siri, and Alexa for voice control.
Products used in my smart home:
- TP-Link
- Yeelight
- Google Home (Hub*1, home*1, mini*3)
- Philips Hue (Bulb*3, Go*1, Switch*1)
- Nest (Google has discontinued the Nest API, so it can no longer be used.)
- August Lock
- Unifi Network, Netgear Router, Asus Router
- The full Unifi lineup
- Xiaomi gateway, door/window sensor, motion sensor, smoke alarm, and incoming-call sensor
Results:
Control interface (P.S. I previously wrote a really nice Lovelace UI, but it disappeared after an update. I still haven't started rewriting it because it was so much work.)

Main interface

Login interface (supports trusted subnets for convenient sharing)
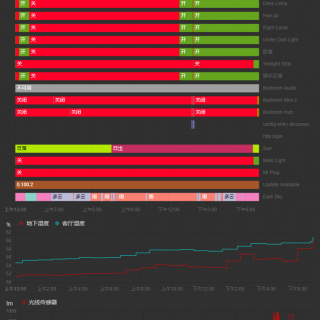
Logbook
Lights and switches (all can be controlled through the web, voice commands, and a phone)
Implementation:
I won't go through the Home Assistant installation here. The links provided explain it clearly and in detail. My setup is also very simple: it runs in Docker on a Synology NAS, with all configuration files under //群晖/docker/config.
[need_reply] https://home-assistant.cc/installation/general/
https://post.smzdm.com/p/761117/ [/need_reply]
Connecting devices
Here's my configuration.yaml. It reflects my own setup, so use it as a template and adapt it to yours.
Basic HA configuration:
homeassistant:
  # 站点名称
  name: KRUNK.CN SMARTHOME
  # 你的位置坐标
  latitude: !secret locationa
  longitude: !secret locationb
  # Impacts weather/sunrise data (altitude above sea level in meters)
  elevation: 0
  # metric for Metric, imperial for Imperial
  unit_system: metric
  # Pick yours from here: http://en.wikipedia.org/wiki/List_of_tz_database_time_zones
  time_zone: America/Toronto
  # Customization file
  customize: !include customize.yaml
  #信任的网段以及api密码 - 如不使用API不建议开启api密码
  auth_providers:
   - type: legacy_api_password
     api_password: !secret http_password
   - type: trusted_networks
     trusted_networks:
        - 10.0.0.0/24
     allow_bypass_login: true
   - type: homeassistant
Some built-in services we'll need:
# Enables configuration UI
config:
system_health:
auth:

# Uncomment this if you are using SSL/TLS, running in Docker container, etc.
http:
    base_url: krunk.cn #如需外网访问需要设定这个地址
    #api_password: !secret http_password
    ssl_certificate: /config/smarthome.krunk.cn.crt #外网需要ssl证书
    ssl_key: /config/smarthome.krunk.cn.key #证书密钥
    cors_allowed_origins:
    - https://ca.krunk.cn
    - https://ws.krunk.cn

api:

# Checks for available updates
# Note: This component will send some information about your system to
# the developers to assist with development of Home Assistant.
# For more information, please see:
# https://home-assistant.io/blog/2016/10/25/explaining-the-updater/
updater:
  # Optional, allows Home Assistant developers to focus on popular components.
  # include_used_components: true

# Discover some devices automatically
#开启自动搜索新智能设备 我禁用是因为我想纯手工配置
#discovery:

# Allows you to issue voice commands from the frontend in enabled browsers
#conversation:
# Enables support for tracking state changes over time
history:
# View all events in a logbook
logbook:
# Enables a map showing the location of tracked devices
map:
# Track the sun
sun:

group: !include groups.yaml
automation: !include automations.yaml
script: !include scripts.yaml
Weather service:
weather:
  - platform: darksky
    api_key: cac4a0dc10fe69a15a3d6367e51e342c
Checking how much I still owe on my phone:
# Sensors
sensor:
    #Fido
  - platform: fido
    name: Fido Balance
    username: !secret fidoaccount
    password: !secret fidopw
    monitored_variables:
     - balance
Check server uptime:
binary_sensor:
  - platform: uptimerobot
    api_key: !secret bloguptimerobot #Blog
  #- platform: uptimerobot
  #  api_key: !secret wsuptimerobot #WS
Text-to-speech service (I once wanted to use it to say “Welcome home”):
# Text to speech
tts:
  - platform: google_translate
    service_name: google_say
TP-Link wall switch:
tplink:
  discovery: false
  switch:
    - host: !secret IP
HomeKit configuration:
homekit:
  auto_start: true
  port: 51827
  filter:
    include_domains:
      - switch
      - media_player
    include_entities:
      - light.yeelight_strip_34ce008b1407
      - light.gateway_light_7811dcfd6574
      - light.yeelight_strip
      - sensor.illumination_7811dcfd6574
      - binary_sensor.motion_sensor_158d00024818ad
      - binary_sensor.smoke_sensor_158d0001e6426c
      - binary_sensor.door_window_sensor_158d000237cf91
  entity_config:
    media_player.krunk_bedroom_home:
      feature_list:
        - feature: play_pause
Connect to my router to track whether my phone is at home:
asuswrt:
  host: !secret IP
  username: !secret asusun
  password: !secret asuspw

device_tracker:
  - platform: asuswrt
    interval_seconds: 12
    consider_home: 60
    new_device_defaults:
      track_new_devices: false
      hide_if_away: False
  - platform: unifi
    host: !secret IP
    username: krunk
    password: !secret unifipassword
    verify_ssl: false
    interval_seconds: 12
    consider_home: 60
    new_device_defaults:
      track_new_devices: false
      hide_if_away: False
  - platform: netgear
    host: !secret IP
    password: !secret netgearpassword
    port: 80
    interval_seconds: 12
    consider_home: 60
    new_device_defaults:
      track_new_devices: false
      hide_if_away: False
Plex media controls:
media_player:
  - platform: plex
    entity_namespace: 'plex'
    include_non_clients: true
    scan_interval: 60
    show_all_controls: false
    use_custom_entity_ids: true
    use_episode_art: true
    remove_unavailable_clients: true
    client_remove_interval: 120
Xiaomi gateway:
xiaomi_aqara:
  discovery_retry: 5
  gateways:
    - key: !secret xiaomigatewayapi
      host: !secret IP
Philips Hue:
hue:
  bridges:
    - host: !secret IP
      allow_unreachable: true
Yeelight light strip:
yeelight:
  devices:
    !secret IP:
      name: Yeelight Strip
IFTTT Webhook:
ifttt:
  key: !secret iftttkey
Google Home:
cast:
  media_player:
  - host: !secret IP
  - host: !secret IP
  - host: !secret IP
  - host: !secret IP
  - host: !secret IP
Surveillance:
camera:
  - platform: ffmpeg
    name: Bedroom Camera
    input: !secret RTSP
  - platform: uvc
    nvr: !secret IP
    port: 7443
    key: !secret rtspkey
    password: !secret rtsppw
    ssl: true
Theme configuration
Applying a good-looking theme:
# Enables the frontend
frontend:
  themes: !include theme.yaml
  extra_html_url:
    - /local/icons/icons.html
Create a file named theme.yaml:
darkred:
    # Main colors that can be changed
  dark-primary-color: "#c66900"
  disabled-text-color: "#545454"
  divider-color: "rgba(255, 255, 255, 0.12)"
  light-primary-color: "#e06c6c"
  paper-card-background-color: "#1d1d1d"
  paper-grey-200: "#191919"
  paper-item-icon-color: "#d3d3d3"
  paper-listbox-background-color: "#202020"
  primary-background-color: "#303030"
  primary-color: "#d32f2f"
  primary-text-color: "#cfcfcf"
  secondary-background-color: "#131313"
  sidebar-text_-_background: "#62717b"
    # Colors based on variables, see above
  paper-card-header-color: "var(--paper-item-icon-color)"
  paper-item-icon-active-color: "var(--primary-color)"
  paper-item-icon_-_color: "var(--primary-text-color)"
  paper-listbox-color: "var(--primary-text-color)"
  paper-grey-50: "var(--primary-text-color)"
  paper-slider-active-color: "var(--primary-color)"
  paper-slider-knob-color: "var(--primary-color)"
  paper-slider-knob-start-color: "var(--primary-color)"
  paper-slider-pin-color: "var(--primary-color)"
  paper-slider-secondary-color: "var(--light-primary-color)"
  paper-toggle-button-checked-ink-color: "var(--dark-primary-color)"
  paper-toggle-button-checked-button-color: "var(--primary-color)"
  paper-toggle-button-checked-bar-color: "var(--light-primary-color)"
  paper-toggle-button-unchecked-bar-color: "var(--primary-text-color)"
  secondary-text-color: "var(--primary-color)"
  table-row-background-color: "var(--paper-card-background-color)"
  table-row-alternative-background-color: "var(--sidebar-text_-_background)"
darkcyan:
    # Main colors that can be changed
  primary-color: "#00bcd4"
  disabled-text-color: "#545454"
  divider-color: "rgba(255, 255, 255, 0.12)"
  paper-card-background-color: "#4e4e4e"
  paper-grey-200: "#191919"
  paper-item-icon-color: "#d3d3d3"
  paper-listbox-background-color: "#202020"
  paper-listbox-color: "#FFFFFF"
  primary-background-color: "#303030"
  primary-text-color: "#cfcfcf"
  secondary-background-color: "#2b2b2b"
  secondary-text-color: "#04a7bc"
    # Colors based on variables, see above
  label-badge-background-color: "var(--secondary-background-color)"
  label-badge-text-color: "var(--text-primary-color)"
  paper-card-header-color: "#var(--paper-item-icon-color)"
  paper-grey-50: "var(--primary-text-color)"
  paper-item-icon-active-color: "var(--primary-color)"
  paper-item-icon_-_color: "var(--primary-text-color)"
  paper-slider-active-color: "var(--primary-color)"
  paper-slider-knob-color: "var(--primary-color)"
  paper-slider-knob-start-color: "var(--primary-color)"
  paper-slider-pin-color: "var(--primary-color)"
  paper-slider-secondary-color: "var(--light-primary-color)"
  paper-toggle-button-checked-ink-color: "var(--dark-primary-color)"
  paper-toggle-button-checked-button-color: "var(--primary-color)"
  paper-toggle-button-checked-bar-color: "var(--light-primary-color)"
  paper-toggle-button-unchecked-bar-color: "var(--primary-text-color)"
At this point, all devices should be connected and the complete interface should be displayed.
Automation Configuration
Set the theme on startup:
- alias: 'Set theme at startup'
  initial_state: 'on'
  trigger:
  - platform: homeassistant
    event: start
  action:
    service: frontend.set_theme
    data:
      name: darkred
Startup notification:
- alias: 'Notified Krunk at startup'
  initial_state: 'on'
  trigger:
  - platform: homeassistant
    event: start
  action:
    service: ifttt.trigger
    data: {"event":"start_up"}
Security alerts while away:
- alias: 'Security System start when Krunk leaves home'
  initial_state: 'on'
  trigger:
    platform: state
    entity_id: binary_sensor.motion_sensor_158d00024818ad
    to: 'on'
  condition:
  - condition: state
    entity_id: device_tracker.krunkgalaxys9
    state: 'not_home'
  action:
    service: ifttt.trigger
    data: {"event":"Alarm_HA"}
Turn the lights off when leaving and on when arriving home:
- alias: Turn on the lights when Krunk gets home
  initial_state: 'on'
  trigger:
    platform: state
    entity_id: device_tracker.krunkgalaxys9
    from: 'not_home'
    to: 'home'
  condition:
  - after: sunset
    condition: sun
  action:
    - service: light.turn_on
      entity_id: group.all_lights
    - service: switch.turn_on
      entity_id: switch.main_light

- alias: Turn off the lights when Krunk leaves home
  initial_state: 'on'
  trigger:
    platform: state
    entity_id: device_tracker.krunkgalaxys9
    from: 'home'
    to: 'not_home'
  action:
    - service: light.turn_off
      entity_id: group.all_lights
    - service: switch.turn_off
      entity_id: switch.main_light
Controlling the lights with a Xiaomi button
- alias: Turn on all the lights by Mi button
  initial_state: 'on'
  trigger:
    platform: event
    event_type: xiaomi_aqara.click
    event_data:
      entity_id: binary_sensor.switch_158d0002412a5d
      click_type: single
  condition:
    - condition: state
      entity_id: switch.main_light
      state: 'off'
  action:
    - service: light.turn_on
      entity_id: group.all_lights
    - service: switch.turn_on
      entity_id: switch.main_light

- alias: Turn off all the lights by Mi button
  initial_state: 'on'
  trigger:
    platform: event
    event_type: xiaomi_aqara.click
    event_data:
      entity_id: binary_sensor.switch_158d0002412a5d
      click_type: single
  condition:
    - condition: state
      entity_id: switch.main_light
      state: 'on'
  action:
    - service: light.turn_off
      entity_id: group.all_lights
    - service: switch.turn_off
      entity_id: switch.main_light
Automatically turn off the Xiaomi gateway light (so you don't have to exclude this light from being switched off each time):
- alias: Turn off the useless light
  initial_state: 'on'
  trigger:
    platform: state
    entity_id: light.gateway_light_7811dcfd6574
    to: 'on'
  action:
    - service: light.turn_off
      entity_id: light.gateway_light_7811dcfd6574
Using the API
I experimented with controlling lights using Python a long time ago and wrote a clap-to-toggle-the-lights project. There are plenty more projects for you to explore.
See my GitHub project for details:
[need_reply] https://github.com/KrunkZhou/PI-Clap [/need_reply]
Video demonstration:
https://www.instagram.com/p/Bfd9XiGl3wQ/
Building a Desktop Touchscreen Control Panel
Still in progress...
Published 10/16/2019 · Krunk Zhou
Join the conversation